Is your organisation:
- Wanting to get more out of your Software Developers?
- Wanting to increase RoI?
- Spending too much money fixing bugs?
- Development team not releasing business value fast enough?
- Maybe your a software developer and you want to lift your game to the next level?
If any of these points are of concern to you… read on.
There are many things we can do to lift a software developers productivity and thus the total output of The Development Team. I’m going to address some quick and cheap wins, followed by items that may take a little longer to implement, but non the less, will in many cases provide even greater results.
What ever it takes to remove friction and empower your software developers to work with the least amount of interruptions, do it.
Allow them to create a space that they love working in. I know when I work from home my days are far more productive than when working for a company that insists on cramming as many workers around you into a small space as possible. Chitter chatter from behind, both sides and in front of you will not help one get their mind into a state of deep thought easily.
I have included thoughts from Nicholas C. Zakas post to re-iterate the common fallacies uttered by non-engineers.
- I don’t understand why this is such a big deal. Isn’t it just a few lines of code? (Technically, everything is a few lines of code. That doesn’t make it easy or simple.)
- {insert name here} says it can be done in a couple of days. (That’s because {insert name here} already has perfect knowledge of the solution. I don’t, I need to learn it first.)
- What can we do to make this go faster? Do you need more engineers? (Throwing more engineers at a problem frequently makes it worse. The only way to get something built faster is to build a smaller thing.)
Screen real estate
When writing code, a software developers work requires a lot of time spent deep in thought. Holding multiple layers of complexity within immediately accessible memory.
One of the big wins I’ve found that helps with continuity, is maximising your screen real estate.
I’ve now moved up to 3 x 27″ 2560×1440 IPS flat panels. These are absolutely gorgeous to look at/work with.
Software development generally requires a large number of applications to be running at any one time.
For example in any average session for me, I generally have somewhere around 30 windows open.
The more screen real estate a developer has, the less he/she has to fossick around for what he/she needs and switch between them.
Also, the less brain cycles he/she has to spend locating that next running application, means the more cycles you have in order to do real work.
So, the less gap there is switching between say one code editor and another, the easier it is for a developer to keep the big picture in memory.
We’re looking at:
- physical screen size
- total pixel count
The greater real estate available (physical screen size and pixel count) the more information you can have instant access to, which means:
- less waiting
- less memory loss
- less time spent rebuilding structures in your head
- greater continuity
Which then gives your organisation and developers:
- greater productivity
- greater RoI
These screens are cheaper than many realise. I set these up 4 months ago. They continue to drop in price.
- FSM-270YG 27″ PC Monitor LED S-IPS WIDE 2560×1440 16:9 WQHD DVI-D $470.98 NZD
- [QH270-IPSMS] Achieva ShiMian HDMI DVI D-Sub 27″ LG LED 2560×1440 $565.05 NZD
- [QH270-IPSMS] Achieva ShiMian HDMI DVI D-Sub 27″ LG LED 2560×1440 $565.05 NZD
It’s just simply not worth not to upgrading to these types of panels.

In this setup, I’m running Linux Mint Maya. Besides the IPS panels, I’m using the following hardware.
- Video card: 1 x Gigabyte GV-N650OC-2GI GTX 650 PCIE
- PSU: 1200w Corsair AX1200 (Corsair AX means no more PSU troubles (7 yr warranty))
- CPU: Intel Core i7 3820 3.60GHz (2011)
- Mobo: Asus P9X79
- HDD: 1TB Western Digital WD10EZEX Caviar Blue
- RAM: Corsair 16GB (2x8GB) Vengeance Performance Memory Module DDR3 1600MHz
One of the ShiMian panels is using the VGA port on the video card as the FSM-270YG only supports DVI.
The other ShiMian and the FSM-270YG are hooked up to the 2 DVI-D (dual link) ports on the video card. The two panels feeding on the dual link are obviously a lot clearer than the panel feeding on the VGA. Also I can reduce the size of the text considerably giving me greater clarity while reading, while enabling me to fit a lot more information on the screens.
With this development box, I’m never left waiting for the machine to catchup with my thought process.
So don’t skimp on hardware. It just doesn’t make sense any way you look at it.
Machine Speed
The same goes for your machine speed. If you have to wait for your machine to do what you’ve commanded it to do and at the same time try and keep a complex application structure in your head, the likelihood of loosing part of that picture increases. Plus your brain has to work harder to hold the image in memory while your trying to maintain continuity of thought. Again using precious cycles for something that shouldn’t be required rather than on the essential work. When a developer looses part of this picture, they have to rebuild it again when the machine finishes executing the last command given. This is re-work that should not be necessary.
An interesting observation from Joel Spolsky:
“The longer it takes to task switch, the bigger the penalty you pay for multitasking.
OK, back to the more interesting topic of managing humans, not CPUs. The trick here is that when you manage programmers, specifically, task switches take a really, really, really long time. That’s because programming is the kind of task where you have to keep a lot of things in your head at once. The more things you remember at once, the more productive you are at programming. A programmer coding at full throttle is keeping zillions of things in their head at once: everything from names of variables, data structures, important APIs, the names of utility functions that they wrote and call a lot, even the name of the subdirectory where they store their source code. If you send that programmer to Crete for a three week vacation, they will forget it all. The human brain seems to move it out of short-term RAM and swaps it out onto a backup tape where it takes forever to retrieve.”
Many of my posts so far have been focused on productivity enhancements. Essentially increasing RoI. This list will continue to grow.
Coding Standards and Guidelines
Agreeing on a set of Coding Standards and Guidelines and policing them (generally by way of code reviews and check-in commit scripts) means software developers get to spend less time thinking about things that they don’t need to and get to throw more time at the real problems.
For example:
Improving tool sets has huge gains in productivity. In most cases many of the best tools are free. Moving from the likes of non distributed source control systems to best of bread distributed.
There are many more that should be considered.
Wiki
Implementing an excellent Wiki that is easy to use. I’ve put a few wiki’s in place now and have used even more. My current pick of the bunch would have to be Atlassians Confluence. I’ve installed this on a local server and also migrated the instance to their cloud. There are varying plans and all very reasonably priced with excellent support. If the wiki you’re planning on using is not as intuitive as it could be, developers just wont use it. So don’t settle for anything less.
Improving Processes
Code Reviews
Also a very important step in all successful development teams and often a discipline that must be satisfied as part of Scrums Definition of Done (DoD). What this gives us is high quality designs and code, conforming to the coding standards. This reduces defects, duplicate code (DRY) and enforces easily readable code as the reviewer has to understand it. Saves a lot of money in re-work.

Scott Amblers Cost of change curve
Definition of Done (DoD)
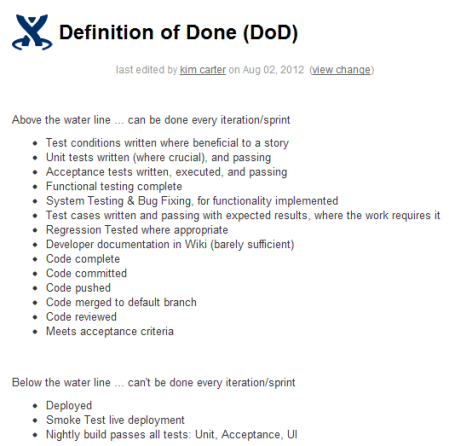
Get The Team together and decide on what it means to have each Product Backlog Item that’s pulled into the Sprint Done.
Here’s an example of a DoD that one of my previous Development Teams compiled:

What does Done actually mean?
Come Sprint Review on the last day of the Sprint, everyone knows what it means to be done. There is no “well I thought it was Done because I’ve written the code for it, but it’s not tested yet”.
There are many tools and ways to implement CI. What does CI give you? Visibility of code quality, adherence to standards, reports on cyclomatic complexity, predictability and quite a number of other positive side effects. You’ll know as soon as the code fails to build and/or your fast running tests (unit tests) fail. This means The Development Team don’t keep writing code on top of faulty code, thus reducing technical debt by not having to undo changes on changes later down the track.
I’ve used a number of these tools and have carried out extensive research and evaluation spikes on a number of the most popular offerings. In order of preference, the following are my candidates.
- Jenkins (free and open source, with a great community)
- TeamCity
- Atlassian Bamboo
Release Plans
Make sure you have these. This will reduce confusion and provide a clear definition of the steps involved to get your software out the door. This will reduce the likelihood of screwing up a release and re-work being required. You’ll definitely need one of these for the next item.
Here’s an example of a release notes guideline I wrote for one of the previous companies I worked for.

Continuous Deployment
If using Scrum, The Scrum Team will be forecasting a potentially releasable Increment (the sum of all the Product Backlog items completed during a Sprint and all previous Sprints).
You may decide to actually release this. When you do, you can look at the possibility of automating this deployment. Thus reducing the workload of the release manager or who ever usually deploys (often The Development Team in a Scrum environment). This has the added benefit of consistency, predictability, reliability and of course happy customers. I’ve also been through this process of research and evaluation on the tools available and the techniques to implement.
Here’s a good podcast that got me started. I’ve got a collection of other resources if you need them and can offer you my experience in this process. Just leave a comment.
Implement Scrum (and not the Flaccid flavour)
I hope this goes without saying?
Implementing Scrum to provide ultimate visibility
Get maximum quality out of the least money spent
How to get the most out of your limited QA budget
Driving your designs with tests, thus creating maintainable code, thus reducing technical debt.
Hold Retrospectives
Scrum is big on continual inspection and adaption, self-organisation and fostering innovation. The military have another term for inspection and adaption. It’s called the OODA Loop.
The Retrospective is just one of the Scrum Events that enable The Scrum Team to continually inspect the way they are doing things and improve the way they develop and deliver business value.
Invest a little into your servant leaders
Empowering the servant leaders.
Context Switching
Don’t do it. This is a real killer.
This is hard. What you need to do is be aware of how much productivity is killed with each switch. Then do everything in your power to make sure your Development Team is sheltered from as much as possible. There are many ways to do this. For starters, you’re going to need as much visibility as possible into how much this is currently happening. track add-hock requests and any other types of interruptions that steel the developers concentration. In the last Scrum Team that I was Scrum Master of, The Development Team decided to include another metric to the burn down chart that was on the middle of the wall, clearly visible to all. Every time one of the developers was interrupted during a Sprint, they would record this time, the reason and who interrupted them, on the burn down chart. The Scrum Team would then address this during the Retrospective and empirically address why this happened and work out how to stop it happening every Sprint. Jeff Atwood has an informative post on why and how context-switching/multitasking kills productivity. Be sure to check it out.
As always, if anything I’ve mentioned isn’t completely clear, or you have any questions, please leave a comment 🙂


