This is the sequence of events I took to prepare a Sun Fire V240 for hosting pfSense which is a free and open source FreeBSD based enterprise grade routing solution for a client of mine.
Recently I was tasked with setting up a network with what I considered to be enterprise grade hardware and software as cheaply as possible. When I take on these sorts of tasks, security is forefront in my mind, so I often look toward components that are as open as possible and that don’t sport any known (to me at least) back-doors and are able to be easily upgraded and patched at little to no cost.
A requirement was clean shut-downs on power failure events at least for the critical servers.
Procured Kit
- APC Smart-UPS 5000 with batteries in good condition. Worth a little under $6k if you’re buying new. I wouldn’t buy new. If you shop around, these can be picked up at a fraction of that cost. From my experience the APC kit is some of the best UPS gear available.

- AP9630 UPS network management card $92 new. Most of the details around setting these UPS’s up I’ve already posted on. If you search my blog for “APC UPS” you’ll find it.

- Enterprise grade router/firewall:
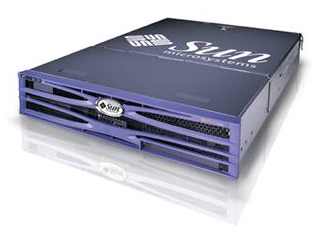
Sun Fire V240 (RISC architecture). 2 x UltraSparc-IIIi 1.5Ghz CPU. 4Gbit on-board Ethernet ports. Lights-out management port. 4GB RAM. 2U. Dual redundant PSU’s. 2 x 72GB Hot Swap 10k SCSI HDD’s. With rack mount rails. Currently going for around $1.5k on Ebay. Price paid: $160 incl shipping. I doubt you’d find anything of these specifications off the shelf for under a $1000. This is a lot of server for a very small amount of money.

- Firmware: pfSense. Free and open source.
Planning
As part of my planning I evaluated (again) whether or not free software routing solutions are actually up to the task of the enterprise. My research led me to believe some were… based on others that had already been down this route ( PTP 😉 ). Openness is a biggie for me. I like to know that eyes are on the software rather than it being closed up in a proprietary package.
I evaluated m0n0Wall, ipCop (Linux based), smoothwall and pfSense. pfSense had been used in quite a few large environments successfully. When I had made my decision on the firmware to use, I went through the hardware requirements and of course started looking for high quality second-hand gear.
For the router hardware I was going to need at lease 1GHz CPU as I wanted to run Snort as my IDS/IPS. PCI-X or PCI-e network adapters (which of course I didn’t need to worry about with the Sun Fire server). Snort needs 512MB RAM minimum. Preferably at least 1GB.
Gaining Access to the Sun Fire V240
Now I had no idea of how the previous owner had setup the configuration of the ALOM (Advanced Lights Out Management). In fact I hadn’t administered a Sun Fire server before at all. On page 11 of the Sun FireTM V210 and V240 Servers Getting Started Guide it states the following:
“The system console is directed to ALOM by default and is configured to show server console information on startup.
ALOM enables you to monitor and control your server over either a serial
connection (using the SERIAL MGT port), or Ethernet connection (using the NET MGT port).
For information about configuring an Ethernet connection, refer to the Sun Advanced Lights Out Manager Software User’s Guide.” The NET MGT port can also be disabled and in my case it turned out it was, but I’ll get to that later. I didn’t have a spare DB-9 to RJ-45 adapter lying around to wire it up and connect to the SERIAL MGT port.

Telnet?
(but didn’t get that far)
Since I was going to go down the path of trying to connect to the ALOM console via the NET MGT Ethernet port, I thought telnet would probably be the path of least resistance.
Page 10 of the “Sun Advanced Lights Outs Manager Software User’s Guide” stated the following:
“The 10-Mbyte Ethernet port enables you to access ALOM from within your company
network. You can connect to ALOM remotely using any standard Telnet client”. On the V240, the
ALOM Ethernet port is referred to as the NET MGT port.
Using a laptop with Kali Linux installed (because it has lots of great tools for network reconnaissance), Running
ethtool eth0
told me that my NIC supported:
10baseT/Half 10baseT/Full
100baseT/Half 100baseT/Full
1000baseT/Half 1000baseT/Full
Wireshark?
Tried connecting directly to the NET MGT port with wireshark running on my laptop. Didn’t get any packets from the device. At the time I thought it may have been because my laptop’s NIC was using 100baseT, but later on I found out that the NET MGT port was disabled.
Tried pinging my broadcast address ping -b 255.255.255.255 then checked my arp table arp -a. No results that looked like what I was looking for. Of course this strategy would have taken quite some time to complete… and in my case it would have yielded no results anyway.
NMap?
I started with the private IPv4 address spaces. Using Wi-fi on my Kali box, tried the 16 bit block:
nmap -sn 192.168.*.*
Got a false positive of a cable modem. How did I work out that it was a false positive?
nmap -A <falsePositiveIPOfCableModem> # Gave me the model and everything I needed to know about the device to rule it out.
Next up the 20 bit block
nmap -sn 172.16.0.0/12
Nmap done: 1048576 IP addresses (0 hosts up) scanned in 108670.97 seconds
In earlier releases of nmap the -sn switch was known as -sP
I decided I needed to try and speed up the scan, so I connected directly to the V240 NET MGT port with a Cat5 patch cable (ethtool told me my laptop’s NIC had MDI-X on (force crossover mode)) and made sure my network card supported 10baseT which the “Sun Advanced Lights Outs Manager Software User’s Guide” told me it needed for the NET MGT port. Turns out the NET MGT port didn’t support 10baseT. Details a bit further down.
Added a static IP address to the /etc/network/interfaces. Currently it looked like:
auto lo
iface lo inet loopback

auto wlan0
iface wlan0 inet dhcp
So I commented out the auto wlan0 and iface wlan0 inet dhcp and added the following:
auto eth0
iface eth0 inet static
address 10.1.1.6
netmask 255.255.255.0
broadcast 10.1.1.255
#gateway 10.1.1.1 # Make sure you don't add a gateway, as we're connecting directly to the V240
followed by:
service networking restart
then changed my /etc/NetworkManager/NetworkManager.conf
managed=true to be managed=false
So Network manager didn’t keep interfering with my interfaces.
I followed this with a
service network-manager restart
followed with ifconfig to make sure my network interface was using the correct IP address, netmask and broadcast. It wasn’t, so…
ifdown eth0
ifup eth0
ifconfig
Success, it now was.
Now to make sure my network card was communicating in a manner that the V240’s NET MGT port would understand.
ethtool eth0
told me 10baseT was supported, but it also told me my current speed was 100Bb/s. So I tried changing the speed with
ethtool -s eth0 speed 10
and received Cannot advertise speed 10. So made the following temporary changes as they’ll be lost on reboot. Changed the duplex… Ran the following:
ethtool -s eth0 speed 10 duplex half
Now with a:
ethtool eth0
I got:
Speed: unknown!
Duplex: Unknown! (255)
So turned the auto negotiation off:
ethtool -s eth0 speed 10 duplex half autoneg off
Now with a:
ethtool eth0
I got:
Speed: 10Mb/s
Duplex: Half
Auto-negotiation: off
#and some other settings.
Some useful ethtool resources:
With these settings the NET MGT port didn’t have it’s green link led on. So I kept playing with the settings. Turns out it would only work with speed 100 duplex full contrary to page 10 of the “Sun Advanced Lights Out Manager Software User’s Guide”
These were the settings that gave me link:
Supported pause frame use: No #Don't think I fiddled with this.
Supports auto-negotiation: Yes
Advertised link modes: Not reported #Don't think I fiddled with this.
Advertised pause frame use: Symmetric #Don't think I fiddled with this.
Advertised auto-negotiation: No
Speed: 100Mb/s
Duplex: full
Port: Twisted Pair #Don't think I fiddled with this.
PHYAD: 1 #Don't think I fiddled with this.
Transceiver: internal #Don't think I fiddled with this.
Auto-negotiation: off
MDI-X: on
Supports Wake-on: g #Don't think I fiddled with this.
Wake-on: d #Don't think I fiddled with this.
Current message level: 0x000000ff (255)
drv prove link timer ifdown ifup rx_err tx_err
Link detected: yes
I was now confident that if the Sun Fire V240 NET MGT port was enabled, we’d find it’s IP address if it was using one from the private space. It was time to try the last and largest private address space. Oh, I also used wireshark to make sure nmap was doing what I expected on my laptop when I ran:
nmap -v -sn 10.0.0.0/8
I was a little confused to start with as nmap told me Scanning 4096 hosts I soon realised after checking the CIDR (Classless InterDomain Routing) and by the output nmap produced, that nmap was doing the scanning in chunks. As there was going to be a lot of results, I setup the output to files:
nmap -v -sn -oA 'scan-%Y-%m-%d_%H-%M 10.0.0.0/8
This produces the output in all three formats as discussed here.
SERIAL MGT Port?
This private address range was going to take a few days to scan, so I decided to have a poke at the SERIAL MGT port on the Sun Fire V240.
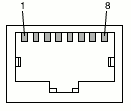
To use the SERIAL MGT port, a RJ-45 patch cable connected to a DB-9 adapter ($4.50 from globalpc) is required Unless you get the official Sun adaptor “530-3100-01”, or still have the one that came in the new box. So I splashed out and went with the $4.50 option. It cost me more in gas to get to the shop than buy the part. I Wired it up according to page 25 of the “Sun Fire V210 and V240 Servers Installation Guide“.
RJ-45 to DB-9 Adapter Crossovers
| SERIAL MGT Port |
Adapter (DB-9) Pin |
| 1 (RTS) |
8 (CTS) |
| 2 (DTR) |
6 (DSR) |
| 3 (TXD) |
2 (RXD) |
| 4 (Signal Ground) |
5 (Signal Ground) |
| 5 (Signal Ground) |
5 (Signal Ground) |
| 6 (RXD) |
3 (TXD) |
| 7 (DSR) |
4 (DTR) |
| 8 (CTS) |
7 (RTS) |
Red wire in with green.
Installed minicom and setserial and did pretty much the same as I did here. Plugged the console cable in and tried to establish a connection.
Then found that by default ALOM only communicates through the SERIAL MGT port at startup (of ALOM I thought), but it seems that at power on of the server also.
At the {1} ok prompt, I typed #. (that’s hash followed with dot) to escape from the system console sc>
I then entered the showsc command and found that the MGT NET port was disabled.
I then ran a
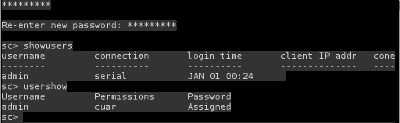
usershow
to see which user accounts existed and was prompted to set a password for the admin user.
“When you connect to ALOM for the first time, you are automatically connected as the admin account.“.
So obviously the seller of the system reset ALOM.

Also audited the user accounts, and the details on the permission levels are here.
Ran the following script. A nice little dialog from Ramesh here (see step 4) too.
setupsc
- Turned NET MGT port on
- Changed the default if_connection from none to ssh
- Answered no to email alerts (only for logged in users)
- Yes to configure the network interfaces
- No to DHCP
- Entered the IP address for the NET MGT port
- Entered the netmask for the NET MGT port
- Entered the gateway for the Net Mgt port
- Should powerstate memory be enabled [y]?
y
- Enabled power on sequencing
Then we need to restart the ALOM to apply the new settings.
resetsc -y
If you still have minicom running, it’ll show you what happens during the boot sequence and then present you with a login prompt.
SSH
At this point I plugged the Ethernet cable from my test switch (10 Mbit/s capable) back into the NET MGT port of the Sun Fire V240 and tested that ALOM was responding on the IP address that I set the NET MGT port to.
ping <myNetMgtIP>
It was answering. So I attempted to SSH in on a different machine.
ssh admin@<myNetMgtIP>
I was presented with the hosts key fingerprint
The authenticity of host <myNetMgtIP> (<myNetMgtIP>)' can't be established.
RSA key fingerprint is <myExistingHostKeyInHex>.
Are you sure you want to continue connecting (yes/no)?
I wanted to know I was connecting to what I thought I was connecting to, so answered no.
Then in minicom I queried the hosts key fingerprint
ssh-keygen -l -t rsa
I was provided with the key fingerprint that matched what I was presented with when I attempted to SSH, so I new I was actually communicating with the server I thought I was.
I then regenerated the hosts key fingerprint
ssh-keygen -r -t rsa
and was provided with the new key. A restart of the SSH daemon is required to load the new host key.
sc> restartssh
Then SSH in. Confirm when prompted that the host key matches the newly provided key.
ssh admin@<myNetMgtIP>
The authenticity of host <myNetMgtIP> (<myNetMgtIP>)' can't be established.
RSA key fingerprint is <myNewHostKeyInHex>.
Are you sure you want to continue connecting (yes/no)? yes
Warning: Permanently added '<myNetMgtIP>' (RSA) to the list of known hosts.

Copyright 2009 Sun Microsystems, Inc.  All rights reserved.
Use is subject to license terms.

Sun(tm) Advanced Lights Out Manager <versionHere> ()

Please login: admin
Please Enter password: *********

sc>
We’re in!
At any time for a list of commands, you can type help.
logout
Connection to <myNetMgtIP> closed.
We’re out!