Update 01/09/2013 Looks like the SX300 mSATA SSD is incompatible with the Eee PC 901.
That’s the device with the 4GB primary SSD and the 16GB secondary SSD.
In looking at Offensive Securities new improved OS Kali, I was keen to take it for a spin. I’ll go over that in a subsequent post. This meant I’d have to find a suitable host for Kali. Kali can be installed on a myriad of platforms. It just so happens that the Eee PC 901 is an excellent device for the purpose, providing it has enough space (8GB incl the 300 security tools it ships with) which it currently didn’t.
For a while now I’ve had a couple of old Eee Pc 901’s I purchased a few years ago… with the 4GB Phison Primary mSATA SSD 50mm x 32mm and the 16GB Phison Secondary SATA SSD (2.5″ (70mm) long). I had read and assumed it to be correct that the mini card, that’s the smaller one in form factor and storage capacity was soldered onto the motherboard and that swapping it out was clouded with mystery and danger.
Top of the 50mm and 70mm SSD’s

Bottom of the 50mm and 70mm SSD’s

First thing I did was to upgrade the BIOS.
ROM: here.
HowTo: here. I used the Easy Flash.
Now the 16GB is easily replaceable as it’s on the bottom of the notebook by the RAM, but I don’t care about that drive. The boot order can’t be changed from the 4GB to the 16GB which is disappointing. So I had to replace the 4GB with a larger drive. As SSD’s are getting faster now also, we notice a significant speed increase. The Atom CPU’s do really well for their size and age, and with the 901’s even though they came out with solid state drives, the newer ones are considerably faster.
For a lot of different applications, the 4GB is just too small. I’ve been waiting for a purpose to use these devices. Now after a bit of research, I found out that the 4GB can actually be replaced without any soldering as I had initially thought necessary.
So that’s what I did. The Epc 901’s are great hacking devices. Light, still reasonably fast CPU’s for what they are and the devices can take a bit of a beating and with the SSD’s you don’t have to worry about HDD’s crashing.
Dismantle the 901
As always, remove all power sources first. That means remove the power cord and the battery. Remove all 13 screws from the underside of the chassis. This includes removing the RAM and 16GB plastic cover and removing the two screws holding in the 16GB SSD. Remove the 16GB SSD and the 1GB (unless you’ve upgraded to 2GB which I had) RAM module. Now of course I didn’t care about voiding the warranty as that was voided years ago.
Now turn the device over and you need to prise the keyboard off.
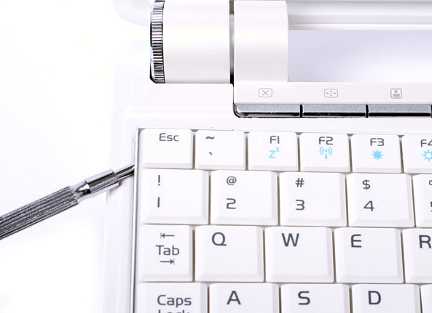
The (3) plastic clips holding the keyboard on are along the top of it. I used a steak knife on each side, but you can use a jewellers screwdriver if you have one (maybe a better option, but the knives worked for me). When you’re pulling the keyboard up at the top, try and keep the pressure on the top edge of the keyboard pushing toward the bottom edge of the keyboard, this helps the clips release. Once these are released, the keyboard can slide up. You can see the 3 retainers on the bottom edge of the keyboard in the below image.

As you can see in the above image, there are another six screws holding the top metal piece down through the motherboard I think and onto the bottom half of the plastic chassis. Remove these. Including the one that has the sticker that voids your warranty covering it… providing you don’t care about that?
Now remove the top half of the plastic chassis from the plastic base. There are some clips along each side, which release reasonably easy with a bit of jiggling. Pull the bottom (nearest to yourself) of the top half of the plastic chassis up. When you have enough room to get in between the top and the base with a small set of long nose pliers, pull the keyboard ribbon out of the motherboard (largest socket highlighted below in red) and do the same with the mouse ribbon (socket highlighted below in red on middle of board). Taking note of which way around they were. Then unplug the cable that transfers signal between the 4 top buttons above the keyboard from the motherboard (socket highlighted below in red, top left of the board).

Now the top piece of the plastic chassis needs to remain intact with the plastic hinge covers which are also part of the plastic running along the top of the top four silver buttons. this can be seen two images above. So this means quite a struggle to prise the plastic parts apart. Take your time. Lots of wiggling rather than excessive force is recommended.
Now once you have the top half of the plastic chassis separate. You’ll need to unplug the CPU fan wire (socket highlighted above in green). Then remove the two screws holding the motherboard to the base part of the plastic chassis. These are by the hinges with white arrows on the motherboard pointing to them.
Now there’s another cable at the bottom edge of the motherboard that needs to be unplugged. This can be seen at the bottom of the image below in the green highlight box.

Now wiggle the motherboard up left side first with the audio ports rather than the right side with the VGA port as the VGA port is sticking through the plastic chassis further.
Now you can finally remove the 4GB mini PCIe SATA SSD (socket shown above in blue highlight box) and replace with a larger faster one.
I used a 64GB A-Data SX300 mSATA SSD.
See my next post for Reassembly of the Eee PC 901
Interweb content I used which aided my decisions and the process:
http://forum.eeeuser.com/index.php?/topic/76496-eee-pc-901-how-do-i-upgrade-my-ssd-drives/
http://forums.tweaktown.com/runcore/38715-runcore-50mm-pro-sata-pci-e-ssd-901-a.html
Directions with images on how to pull the 901 apart but a little ambiguous and missing essential info
Pictures and speed test
In a subsequent post I’ll go through Setting up Kali Linux on the Eee PC 901
